Got Google Slides Game?
I am a Google Slides fangirl. I use it for everything when I am teaching from created hyperdocs (more about them later), posters, stickers, and so much more. Slides is more than it appears to be. When I moved to primarily online word processing through the Google Suite. I was concerned when I did not have publisher. Let’s face it Google Docs is not ideal when trying to do any type of publishing. You cannot control where items are easily. Then I had an epiphany why does Slides have to be used as a slideshow? We can make it any size we want to, right?
Option 1: Google Slides as a Poster Creator

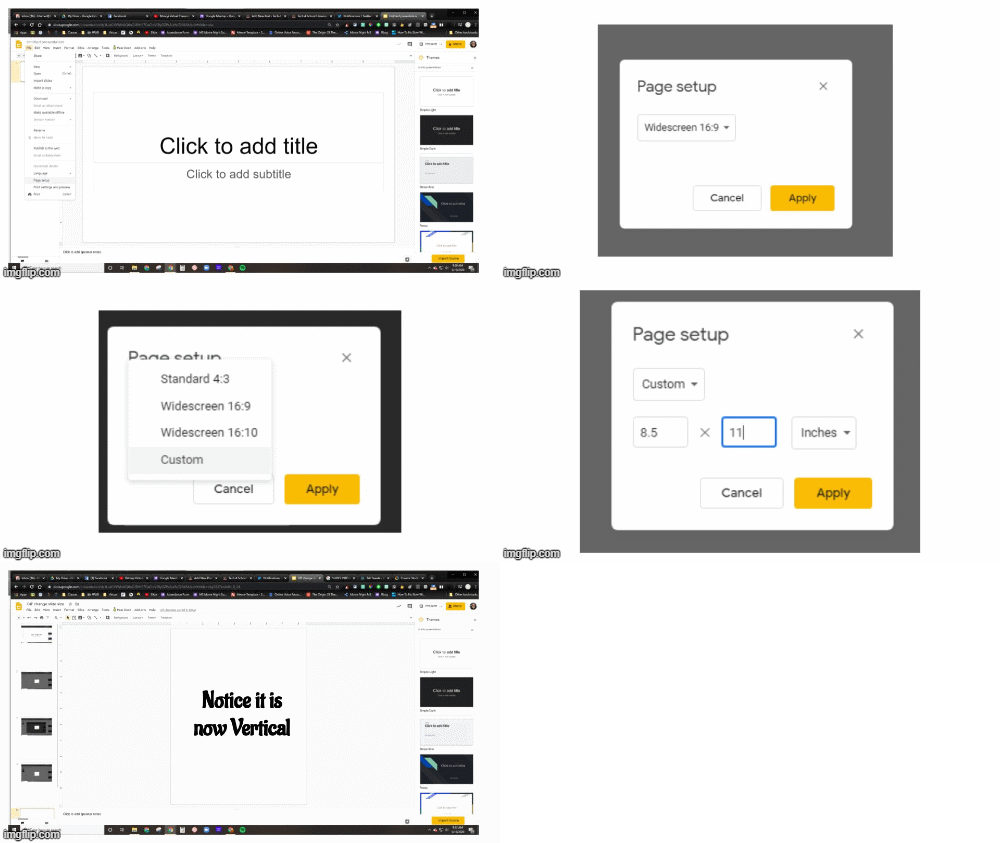
Open a new slide show and you will go to File —> Page Layout —> Click the Drop Down Menu to change to Custom. Then type in your page size in inches, pixels (px), Centimeters, or Points. You could even create a banner for your google classroom using this method. The size for a banner in Google Classroom is: 1000px x 250px (that is in pixels)
What are Pixels?
Pixels, abbreviated as “px”, are also a unit of measurement commonly used in graphic and web design, equivalent to roughly 1⁄96 inch (0.26 mm). This measurement is used to make sure a given element will display as the same size no matter what screen resolution views it.
Wikipedia Contributors. “Pixel.” Wikipedia, the Free Encyclopedia. Wikimedia Foundation, 8 May 2020. Web. 16 May 2020. <https://en.wikipedia.org/wiki/Pixel>
Option 2: Hyperdoc
What is a hyperdoc?
A HyperDoc is a digital document—such as a Google Doc—where all components of a learning cycle have been pulled together into one central hub. Within a single document, students are provided with hyperlinks to all of the resources they need to complete that learning cycle. A great source for template and more details
Source of Definition: Gonzalez, Jennifer. “How HyperDocs Can Transform Your Teaching | Cult of Pedagogy.” Cult of Pedagogy. 11 Jun. 2017. Web. 16 May 2020. <https://www.cultofpedagogy.com/hyperdocs/>
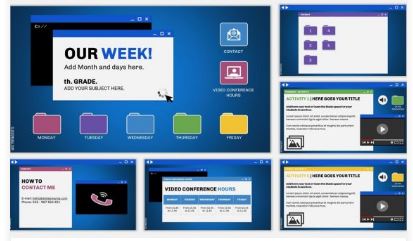
So how do I use them in the library? Great question! I have recently created two original hyperdocs for my students during COVID19 Crisis School. One on Email and one on Deep Fakes. I am currently in the middle of creating one on why Fake News is so alluring. I started creating by deciding on the template I would use. I am a big fan of the Google Slides templates on Slidesmania which gave me a really great template to modify.
This one is my favorites, however, I do not use it as a weekly planner. I take this format and modify it. What I really like about this one is the navigation at the top and the folder scheme. It is ideal for emergency school with the video conference slide and how to contact me. Could I create this myself? Sure but why reinvent the wheel?
To see more all you have to go it click on Education in the top menu. They are created by Paula who has a 9-5 job outside of design and does this for fun. Bless you Paula!
Email Hyperdoc
I created this based off several I found online because due to COVID19 now all of my students had their email open. Prior to this I had been trying to get email for my 6-8 students for 3 years but it was a nonstarter. Immediately this changed when we were all working from home. So now I had students who had no experience with email being expected to check their email, respond, and otherwise interact digitally like never before. I immediately began working on this hyperdoc for my students in my media literacy class which is integrated into ELA for 6-8. After the completion of this assignment we all have seen a huge improvement in email usage and understanding by students.
Hyperdoc: Deepfakes
When I was searching for information to teach my students about Deep Fakes and Understanding the Rise of “Fake” News (which I hate that term but it is identifiable to my students) I discovered the amazing PBS videos on the topic. Here is the video I found called Deepfakes: Can You Spot of Phony Video by Above Noise. Now I really liked the video but I did not really want to do a traditional worksheet on it. I also wanted to be able to do what I might do in class which is pause the video and ask a question. Now I could have used Edpuzzle but I decided against it as I have been doing hyperdocs for a few weeks and wanted to continue this style as students were comfortable with the process.
PBS gives you access to KQED Learn which will allow students have discussions and share outside of their own school. However, getting items approved now that NYS has thrown the gauntlet with Ed Law 2D I knew being able to use KQED Learn would be a process of approval that would require longer than I wanted to wait. Also it would require even more direction and without being with my students I am trying to use the tools they are comfortable with at this time. Therefore, I downloaded the video and uploaded it to Youtube as an video with the details of the website in the description.

As a result I was able to embed the video in a Google Slides presentation. In fact, I embeded that video on 7 sides of my presentation with start and end times that were different for each slide in order to pause and allow the students to reflect and answer a question based on their learning. Click here to make a Copy and you can see the entire slideshow below.
Choose Your News
Here is the Original version created by Heather D. Sanders
The one part that I changed was breaking it into 2 parts. I found that it was far too long for my students digitally. They quickly become overwhelmed and I find that giving them weekly assignments to complete is much better than a 2 week deadline with a longer hyperdoc.
Something I will change for the future will be the need to go outside of the Hyperdoc. A three separate points the user has to go to Google Drawings or another slide show to add information. I would streamline this and make it all part of the hyperdoc. When using this hyperdoc this stumped and caused my students a ton of issues even though in my head the directions were very clear.
Notice Slide 8 in Part 1 and Slide 5 in Part 2. I have changed the original in order to have students stay within the hyperdoc. This decreases the steps the students have to do tremendously. Sometimes it takes actually trying to use something to discover its flaws for your own students.


Pro Tips for Success in Google Slides:
- Linking – you can link anything in Google Slides from images to words and buttons. You can link to outside websites or another slide. This increases the navigation ability. You could create hidden slides that are only used when a student needs help.
- Audio – Slides not includes the ability to add audio that has been added to your Google Drive. My favorite browser audio recorder is Online Voice Recorder. It records, you can clip it, and then download it to your drive/computer. I use this to add audio to my slides for differentiation.
- Embed Video – You can upload video or grab a URL from Youtube to add to a google slide. You can even specific where the video starts and stops to force students to stop and think about what they are watching.
- Bitmojis – add your bitmoji to add some much needed flair to Google Slides. It personalizes it and engages your students.
- Changing Font Size – slides recently updated allowing the ability to use a + and – button for changing font size. OMG I was so excited for this one. It makes tweaking font size soooo much easier.
- Changing Page Size – do not be limited to the traditional presentation size. Make your slides any size you want
- Backgrounds – make images backgrounds with text you do not want students to edit. Students are masters of deleting information they should not. Check out my video on Reinventing the Worksheet to see more about that topic.


